The premise dashboard was created to allow you to manage Voice Elements in your On-Premise environment. In this article, we will give you a tour of the dashboard with some helpful tips.
Table of Contents
The Dashboard
Service Status
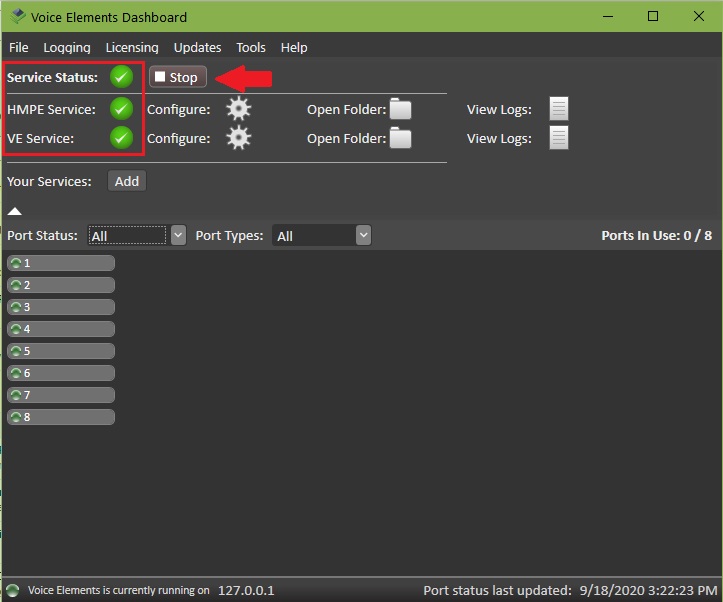
HMP Elements and Voice Elements both run as services. You can Start or Stop the services as needed. Your services are running when you see green checkmarks.

HMPE Service
The HMPE Server handles the SIP Stack, RTP and all of the underlying call control functions.
Configure
You can configure HMPE Service (HMP Elements Service) by pressing the Configure Gear or by using the wizard. For more information on the HMPE settings, see HMP Elements Server Config File.
Open Folder
Easy access to the HMP Elements Server folder on your hard drive.
View Logs
Easy access to HmpServer.Log. This log is stored in the HMP Elements Server folder on your hard drive.
VE Service
The VE Service (Voice Elements Service) provides a layer to allow one or many different applications to connect and control the calls. It abstracts the more difficult tasks of maintaining call state away from the end application and provides robust call handling and clean up at the conclusion of each call.
Configure
You can configure VE Service by pressing the Configure Gear or by using the wizard. For more information on configuring VE, see Voice Elements Server Config File.
Open Folder
Easy access to the Voice Elements Server folder on your hard drive.
View Logs
Easy access to ElementsServer.Log.
Your Services
To add your custom application, click the Add button next to Your Services. Enter your Windows Service Name. This allows you to more easily monitor its status, and start or stop the service.
Port Status
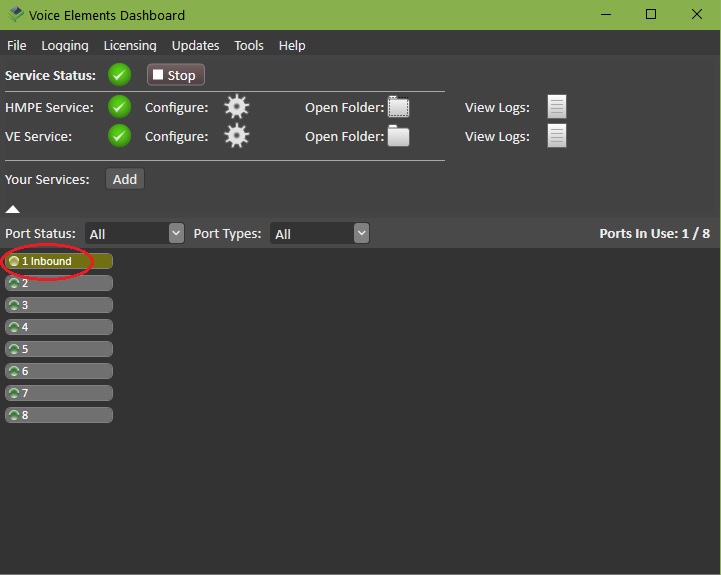
You can clearly see when a port is active and the type of activity taking place.

Monitoring Feature
Voice Elements contains a monitoring feature that allows you to update the Port Status during calls to reflect the activity happening at that moment. This can be done in your code with a command that looks like this:
ChannelResource.SetMonitorData("In Conference");
This particular example would change the Port Status to ‘In Conference’ when the call progressed to that section of your code. You can place this monitoring code every place you would like the Port Status to reflect where the call is at that moment in your code: Getting Digits, Dialing, Playing Instructions, etc.
At a glance, you would see the activity that is happening on each call.
// SCREENSHOT
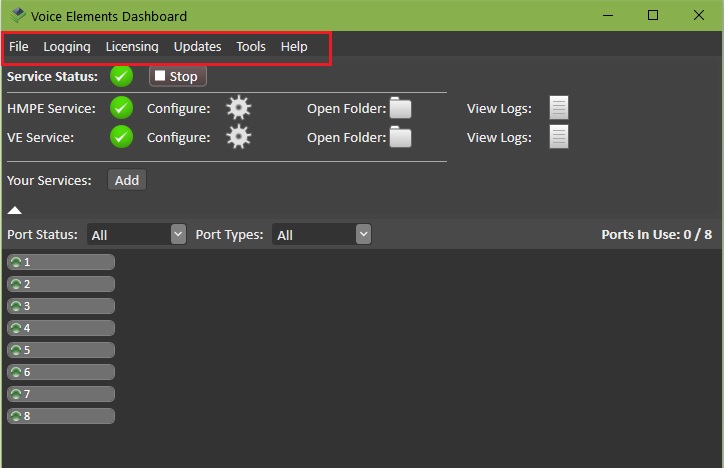
Dashboard Menu
Logging
Our logs show what the system is doing and helps with diagnostics. Should you run into any issues, it is very helpful to e-mail both sets of these logs to Support. Or you can use the menu option Send Logs in the Logging drop-down list.
Event Viewer and Services Viewer open the viewers for your local machine.
Licensing
Scenarios in which you would Deactivate and Activate a license:
-
- Moving to Another Machine: To move to another machine, you would uninstall the license from your current machine by selecting Deactivate. Make sure you have the license key documented or have your original email with the license key in it. Install the software on the new machine. Add the license key during the setup wizard. (Please note you must deactivate the license first before activating in on the new machine. This process is the same with either a demo or production license.)
- Converting to Production: Initially, you are testing your application with your demo license. When you purchase your production license, you would deactivate your demo license and then activate your production license.
- Adding Ports to an Existing Production License: At any time you may order more ports to support a higher volume of calls, or add conference, speech or WebRTC resources by contacting Support. Once the order is complete, you need to reinstall the license.
Updates
Check for Software Updates, Backup or Roll Back your system.
Tools
Launch Wizard: Anytime you need to make changes to your software setup (like change your Connectivity), re-launch the Wizard here.
Run Sample Application: Here is where you’ll find the Sample App. You can also run it from the Wizard.
Help
Support: Navigates you to the Technical Documentation on the Voice Elements website.
VE Development Help: Navigates to our development site where you can find everything you need to code your telephony application.
Build and Test Your Application
Use our demo environment to build and test your application.
Ready for Production?
When you have completed your application using your premise demo license and you’re ready for production, contact Support to purchase your production license.
Our Pricing page details all the options available to you. Premise licenses can be paid for on a subscription basis or purchased outright. We can help you determine the number of ports and resources needed to launch your application into production.
Contact us and we’ll get you off to a great start!

